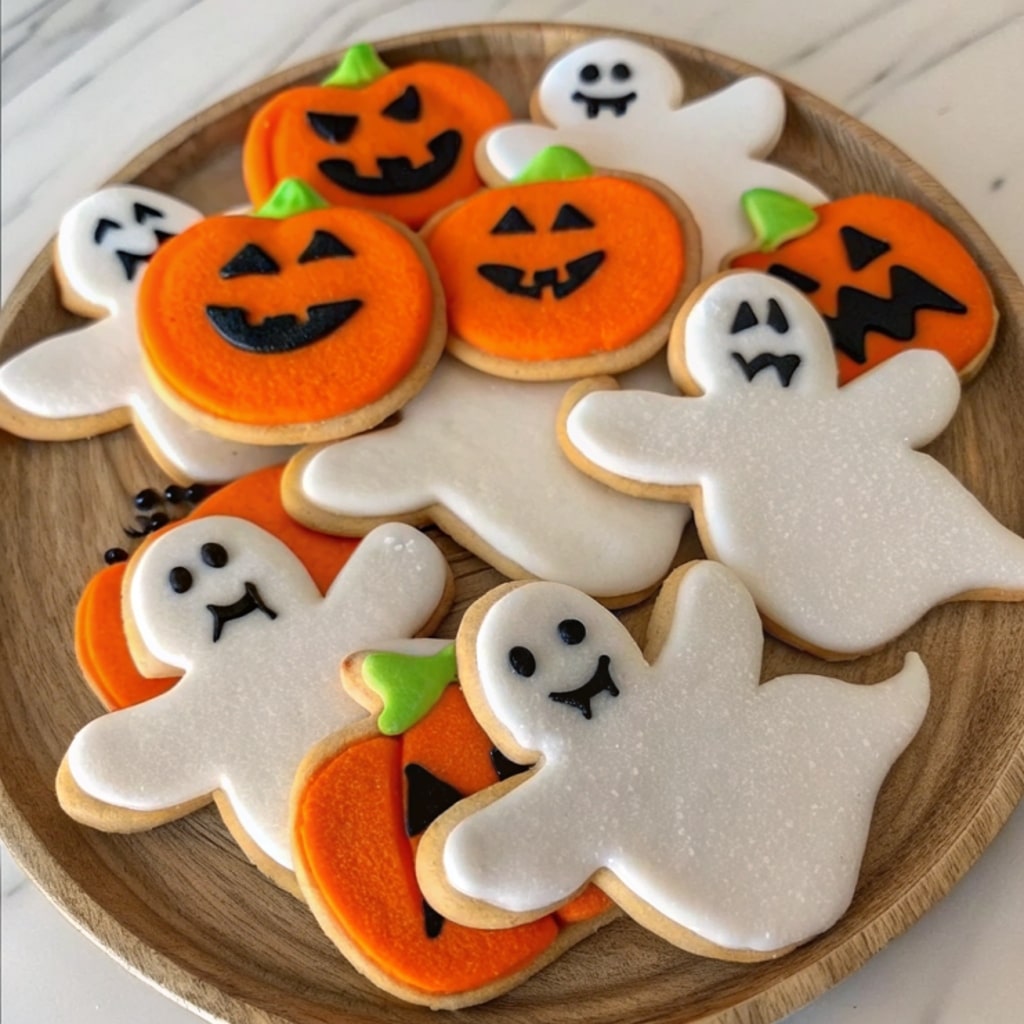
Halloween is the holiday where sweets get to play dress-up, and nothing captures that spirit better than Halloween sugar cookies. Imagine buttery cookies cut into pumpkins, bats, and ghosts, each one decorated with colorful icing that makes them as much fun to look at as they are to eat.
When I was little, my grandma would hand me a piping bag full of royal icing and let me loose on a tray of cookies. My bats looked like blobs and my pumpkins were lopsided, but I was thrilled. That’s the beauty of decorated cookies—they don’t have to be perfect to be festive.

If you’ve already tried playful Bloody Red Velvet Cake Pops or eye-catching Halloween Cakesicles, these cookies will be your next go-to. They’re easy enough for kids, customizable for parties, and guaranteed to be eaten before the night is over.
Table of Contents
Why You’ll Love Halloween Sugar Cookies
- Festive & Fun → Perfect for Halloween cookie designs like pumpkins, ghosts, bats, and spiders.
- Kid-Friendly → Decorating cookies is an activity and a treat in one.
- Endless Creativity → Use royal icing, buttercream, or simple glaze for different styles.
- Make Ahead Friendly → Bake cookies in advance, then decorate closer to the party.
- Perfect for Parties → Wrap individually for Halloween desserts kids will love.
- Beginner Friendly → You don’t need professional skills to make these cookies look great.
If you’re a fan of colorful desserts, you’ll also love Strawberry Crunch Cookies—they’re just as playful but with a fruity twist.
Ingredients
- 2 ¾ cups all-purpose flour
- 1 teaspoon baking powder
- ½ teaspoon salt
- 1 cup unsalted butter, softened
- 1 cup granulated sugar
- 1 large egg
- 2 teaspoons vanilla extract
- Royal icing, buttercream, or glaze for decorating
- Food coloring (orange, black, purple, green)
- Halloween sprinkles, candy eyes, or edible glitter
Step-by-Step Instructions
- Make the Dough → Cream butter and sugar until fluffy. Add egg and vanilla. Mix in flour, baking powder, and salt until combined.
- Chill the Dough → Wrap in plastic and refrigerate for at least 1 hour. This helps cookies hold their shape.
- Cut Shapes → Roll dough to ¼-inch thick. Use cookie cutters for pumpkins, ghosts, bats, or witches’ hats.
- Bake Cookies → Place on a lined baking sheet and bake at 350°F for 8–10 minutes. Cool completely.
- Prepare Icing → Mix royal icing or buttercream. Tint with Halloween colors.
- Decorate → Outline with royal icing, flood with thinner icing, or spread with buttercream. Add sprinkles and candy eyes for fun.
- Set & Serve → Let icing dry before stacking or packaging.
How to Serve Halloween Sugar Cookies
Serving Halloween sugar cookies is as much about presentation as flavor. They instantly brighten up any dessert table and can be styled in endless ways.
- On a Dessert Table → Arrange cookies on black platters or wooden boards with candy corn scattered around. Add fake spider webs or mini pumpkins for atmosphere.
- Individually Wrapped → Slip decorated cookies into clear bags tied with orange and purple ribbon. Perfect for trick-or-treat favors or classroom parties.
- Paired with Drinks → Serve with apple cider, hot chocolate, or pumpkin spice lattes for a cozy pairing.
- Cookie Decorating Party → Bake plain cookies and set out icing bags and sprinkles. Guests can decorate their own—it’s interactive and fun.
- As a Dessert Platter → Mix cookies with Blueberry Cookies and other treats for variety.
Story moment: Last year, I made a batch of ghost cookies with candy eyes. When I set them out, the kids were convinced the ghosts were “watching” them, which made them even more excited to eat them. That’s the magic of Halloween baking—sweets that make people smile before they even take a bite.
How to Store Halloween Sugar Cookies
Halloween sugar cookies are make-ahead friendly, which means you can bake them days before the party and still have them taste fresh.
- Room Temperature → Store in an airtight container for up to 1 week. Place parchment between layers to protect icing.
- Refrigerator → Cookies can be chilled for up to 10 days, though room temperature storage usually works fine.
- Freezer → Freeze undecorated cookies for up to 2 months. Thaw, then decorate closer to Halloween.
Extra tips:
- Let icing fully harden before stacking to prevent smudges.
- If gifting, wrap cookies individually right after icing dries.
- Store decorated cookies in a single layer to preserve designs.
Pro tip: Bake the cookies a week before Halloween, freeze them, then decorate the night before your party. This saves time and lets you focus on having fun with guests instead of rushing in the kitchen.
Tips to Make Halloween Sugar Cookies
These cookies are simple, but a few tips guarantee success:
- Chill the Dough → Prevents spreading and keeps shapes sharp.
- Roll Evenly → Use rolling pin guides or chopsticks to ensure even thickness.
- Bake Until Set → Edges should be just golden; overbaking makes them hard.
- Decorating Techniques:
- Outline with stiff royal icing, then flood with thinner icing for smooth finishes.
- Use buttercream for textured designs like monster fur.
- Add sprinkles while icing is wet so they stick.
- Keep It Fun → Kids’ cookies don’t need to be perfect. Sometimes the wobbly lines are the most charming.
Think of decorating as storytelling. A crooked grin on a pumpkin cookie might look scarier than a perfect one. That imperfection is what makes each cookie unique and memorable.
Variations of Halloween Sugar Cookies
The beauty of sugar cookies is that you can change the look with just a few tweaks. Here are some fun Halloween cookie ideas:
- Pumpkin Cookies → Orange icing with black jack-o’-lantern faces.
- Ghost Cookies → White icing with candy eyes.
- Monster Cookies → Green icing, candy eyes, and goofy expressions.
- Spider Web Cookies → Black icing webs over white backgrounds.
- Bloody Cookies → Drizzle red gel icing for a creepy finish (inspired by Bloody Red Velvet Cake Pops).
- Glittery Cookies → Use edible glitter for a glamorous spin.

Hosting a Halloween spread? Pair sugar cookies with Halloween Cakesicles for chocolate lovers and cookies for frosting fans. Together, they create balance and variety that everyone will appreciate.
FAQs
Can I make Halloween sugar cookies without royal icing?
Yes—use buttercream or a simple powdered sugar glaze.
How long does royal icing take to dry?
At least 4–6 hours at room temperature. Overnight is best.
Can I freeze decorated cookies?
Yes, but decorations may lose shine. Freeze undecorated for best results.
What food coloring works best?
Gel food coloring gives vibrant shades without thinning the icing.
Final Thoughts
Halloween sugar cookies are more than desserts—they’re edible art projects that bring families together. Whether you’re decorating with kids, prepping treat bags, or creating a dessert table centerpiece, these cookies add a pop of color and playfulness to your celebration. They’re proof that baking at Halloween is about joy, laughter, and a little spooky creativity.
Follow me on Facebook and Pinterest where I share cozy, easy-to-make baking recipes just like this one.
PrintHalloween Sugar Cookies
- Total Time: 1 hour 30 minutes
- Yield: 36 cookies 1x
- Diet: Vegetarian
Description
Halloween Sugar Cookies are buttery cut-out cookies decorated with colorful icing and sprinkles. Perfect for Halloween parties and kids’ activities.
Ingredients
- 2 ¾ cups all-purpose flour
- 1 teaspoon baking powder
- ½ teaspoon salt
- 1 cup unsalted butter, softened
- 1 cup granulated sugar
- 1 large egg
- 2 teaspoons vanilla extract
- Royal icing or buttercream
- Food coloring (orange, black, purple, green)
- Halloween sprinkles, candy eyes
Instructions
1. Cream butter and sugar until fluffy. Add egg and vanilla.
2. Mix in flour, baking powder, and salt until dough forms.
3. Chill dough for at least 1 hour.
4. Roll dough to ¼-inch thick and cut into Halloween shapes.
5. Bake at 350°F for 8–10 minutes until edges are set.
6. Cool completely before decorating.
7. Prepare royal icing and tint with food coloring.
8. Decorate cookies with icing, sprinkles, and candy eyes.
9. Let icing dry before stacking or wrapping.
Notes
Chill dough for clean cookie shapes.
Use gel food coloring for vibrant icing colors.
Store at room temperature for 1 week or freeze undecorated for 2 months.
- Prep Time: 20 minutes
- Cook Time: 10 minutes
- Category: Dessert
- Method: Baking
- Cuisine: American
Nutrition
- Serving Size: 1 cookie
- Calories: 140
- Sugar: 10g
- Sodium: 80mg
- Fat: 6g
- Saturated Fat: 4g
- Unsaturated Fat: 2g
- Trans Fat: 0g
- Carbohydrates: 19g
- Fiber: 0g
- Protein: 2g
- Cholesterol: 25mg
